Generate an OG Image using Edge Functions (Vercel)
Mohanad Alrwaihy
February 21, 2023
110
1
Open Graph (OG) Images are important for any site to increase interactivity when the link of your site is linked around the web it is going to encourage users to click on it and increase visitors to your website.
5 min read
In this article, we are going to learn about Open Graph (OG) meta tags and how to use them on any page and also how we can generate Images using Vercel Edge Functions.
What is Open Graph (OG)?
Open Graph meta tags are responsible for how your website URLs will look when shared on social media.
When sharing a link to Facebook, Twitter, WhatsApp, or other social media sometimes you will see that there is an image to the link you have shared that makes it more attractive to be clicked. But sometimes you will not see that and the link will be boring with a gray empty box.
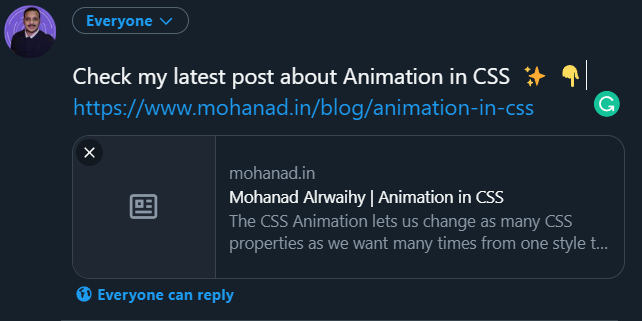
OG VS No OG
Below is an example of sharing a link to one of my posts where Twitter can see the OG properties and generate amazing cards.
OG Image found:

No OG image found:
How to use OG?
We said that Open Graph are meta tags and we can use them in the HTML head tag of any page and we can identify them when we see og: before a property name.
OG Tags:
og:title
This is used for the title of the content.
CSHTML<meta property="og:title" content="Generate OG Image" />og:description
This is used for more information about the content.
CSHTML<meta property="og:description" content="Open Graph (OG) Images are important for any site to increase interactivity when the link of your site is linked around the web..." />og:url
The URL to the content.
CSHTML<meta property="og:url" content="https://mohanad.in/blog/generate-og-image" />og:image
Here is the reference to the image.
CSHTML<meta property="og:image" content="https://imageURL.jpg" />og:image:type
Define image type.
CSHTML<meta property="og:image:type" content="image/jpeg" />og:image:width
Define image width.
CSHTML<meta property="og:image:width" content="800" />og:image:heigh
Define image height.
CSHTML<meta property="og:image:heigh" content="600" />og:type
The type of content you are sharing.
CSHTML<meta property="og:type" content="article" />og:locale
To define the content language.
CSHTML<meta property="og:locale" content="en" />Vercel Edge Functions
Edge Function allows the content to be served from the CDN server that is closest to the user and with Vercel that process is easy to implement and uses Edge Functions to serve users requests from servers close to them around the globe.
We are going to use Vercel to Generate Edge Functions with Next JS in this tutorial but there are a lot of alternatives to Generate OG Images and here is some of them 👇
Steps to Follow 🪜
Step 1: Create Next JS App
I'm going to create Next JS Application with TailwindCSS 👇
POWERSHELLnpx create-next-app next-og -e with-tailwindcssStep 2: Next JS API Route
In /pages/api folder create this file og.tsx
We are going to use this API in the front end to generate the images.
We have to install @vercel/og despondency first by running this command 👇
POWERSHELLnpm install @vercel/ogInside og.tsx file import imageResponse from @vercel/og and we are going to use Edge Runtime and enable it in the config settings by typing runtime: 'edge'
TYPESCRIPTimport { ImageResponse } from '@vercel/og'
export const config = {
runtime: 'edge',
}Step 3: Create Static Image
To create a simple static image we can export a function and using imageResponse return a normal JSX that is going to be converted to an image when calling the API. we also have to specify the image width and height.
TSXexport default function () {
return new ImageResponse(
(
<div
style={{
fontSize: 128,
color: 'white',
background: 'linear-gradient(90deg, #3fedfb, #8046fc)',
width: '100%',
height: '100%',
display: 'flex',
textAlign: 'center',
alignItems: 'center',
justifyContent: 'center',
}}
>
Hello world!
<span>I'm an Image!</span>
</div>
),
{
width: 1200,
height: 600,
}
)
}Now when calling the API we should see this Image 👇

To add this OG Image to the home we have these steps are required:
- Create a
<meta/>tag inside the<head>of the particular page. - Add
od:imageproperty and thecontentshould be the link to the image source.
Adding OG to the home page 👇
TSX<Head>
<title>Generate OG Images</title>
<meta
property='og:image'
content='https://[URL]/api/og'
/>
<link rel='icon' href='/favicon.ico' />
</Head>This image is going to be the same all the time but we can make the content of the image change and make it Dynamic.
Step 4: Create Dynamic Image
The missing piece to create a Dynamic Image is the parameters we need to fill the image with.
Let's start first by importing NextRequest type👇
TSXimport {NextRequest} from 'next/server';And make these edits to the export function 👇
TSXexport default function handler(req: NextRequest){
try {
return new ImageResponse(
(
<div>
{/* ... */}
</div>
),
{
width: 1200,
height: 600,
}
)
} catch (e: any) {
return new Response('Failed to generate the image', {
status: 500,
})
}
}inside the try statement get the search params with this line 👇
TSXconst {searchParams} = new URL(req.url)Extract the title params 👇
TSX// ?title = <title/>
const title = searchParams.get('title') || "Hello World!"Replace Hello World! with title 👇
TSX<h1>{title}</h1>Now call the API and pass a title parameter to see the result.
Example 👉 /api/og?title=Home Page

You can replace the content on the Home Page with this link.
Customizations
We can do a lot of customizations in terms of the style and how the generated OG image will look like.
Try OG Image Playground provided by Vercel for testing.
Using Emojis
Add emojis to your Generated Image code and try:
TSX<h1>{title} 👋</h1>After the width and height properties of the image add emoji and choose between these options 👇
twemoji- DefaultblobmojinotoopenmojifluentfluentFlat
Example 👇
TSX{
width: 1200,
height: 600,
emoji: 'fluent',
}Add Custom Font
To add a Custom Font to the Image we need to add the wanted font to /public/assets folder in the project root.
You can find fonts using Google Fonts
I'm going to use Rancho Regular 👉 Rancho-Regular.ttf
Now in your /api/og.tsx file before the export function add this to import the font from /assets 👇
TSXconst font = fetch(
new URL('../../public/assets/Rancho-Regular.ttf', import.meta.url)
).then((res) => res.arrayBuffer())Add font to the image properties 👇
TSX{
width: 1200,
height: 600,
emoji: 'fluent',
fonts: [
{
name: 'Rancho',
data: fontData,
style: 'normal',
},
]
}Now all the text in the Image will use the font you have chosen but if you imported more than one font and you want to switch between them you can specify the font like this 👇
TSX<h1 style={{fontFamily: '"Rancho"'}}>{title} 👋</h1>Example 👉 /api/og?title=Home Page

Use TailwindCSS
We can replace the inline style used and instead use TailwindCSS for styling!
The wrapper must have a flex display or it will the image will not be generated.
To use TailwindCSS we need the attribute tw instead of className and replace the inline style 👇
TSX<div
style={{ background: 'linear-gradient(90deg, #3fedfb, #8046fc)'}}
tw='text-[128px] text-white w-full h-full flex text-center items-center justify-center'
>
<h1 tw='uppercase'>{title} 👋</h1>
</div>Not all TailwindCSS classes are supported that's why linear-gradient is used with the inline style method so be careful and try your style with Vercel OG Playground